Build a smart pet feeder with machine learning and Python
If your dog is as insatiable as mine, you are familiar with having to wake up every morning to the sound of gentle whining at the door and the pitter patter of begging paws on the floor — two hours before the alarm. The sun has barely risen on the horizon as you glance out your east facing window, and you can see a moist nose peering under your door frame. Your dog commands you: it’s time to eat.
To allow myself to get some extra zzz’s before work, I’ve built a robot to feed my dog in the morning. It has also come in useful to give him some treats for being a Good Boy™ while I’m spending my day at the office.
In this tutorial you can follow along and build your own pet feeder. You will use the Viam app’s Data Manager to train a custom machine learning model that recognizes your pet and use the Machine Learning Service and the vision service to use it on your robot. The final component is a stepper motor and a 3D printed model which holds and dispenses treats when your pet is recognized.
Hardware
You will need the following hardware components:
- A computer running macOS or Linux
- Raspberry Pi with microSD card (and microSD card reader), with
viam-serverinstalled following the Installation Guide. - Raspberry Pi power supply
- Stepper motor and motor driver
- 12V power supply adaptor for motor driver
- Simple USB powered webcam
- Assorted jumper wires
- Four 16mm or 20mm M3 screws
Tools and other materials
You will also need the following tools and materials:
- Wide mouth Mason Jar or blender cup (if you want to avoid using glass!)
- Small pet treats or dry kibble
- Tools for assembly such as screwdrivers and allen keys
- 3D printer (or somewhere you can order 3D printed parts from)
- 3D printed STL models, wiring, and configuration recommendations.
Software
You will need the following software:
- Python 3
- pip
viam-serverinstalled to your board. If you haven’t done this, we’ll walk you through it in the next section.
Assemble your robot
The STL files for the smart feeder robot are available on GitHub.
There should have been a video here but your browser does not seem to support it.
- Mount your Raspberry Pi to the side of the main body of your pet feeder using the provided mounting screw holes.
- Connect your power source to the Pi through the side hole.
- Mount your webcam to the front of your pet feeder. Connect the USB cable to your Pi.
- Insert the 3D printed stepper motor wheel into your pet feeder. This is what will funnel treats out of your pet feeder programmatically.
- Place your stepper motor into the motor holder part and gently slide the wires through the hole that leads through the body of your feeder and feeds the cables out on the Raspberry Pi side.
- Slide the motor driver holder into the body of your feeder, it should sit flush and fit nicely.
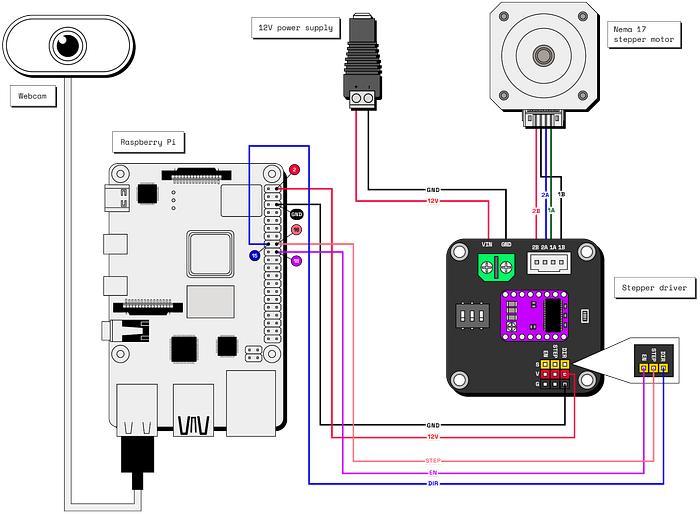
- Connect your stepper motor to the motor driver according to this wiring diagram:
Configure and test your robot
- If you haven’t already, set up the Raspberry Pi by following our Raspberry Pi Setup Guide.
- Go to the Viam app and create a new machine instance in your preferred organization.
- Then follow the instructions on the Setup tab.
Now that you’ve set up your robot, you can start configuring and testing it.
Configure your board
Head to the Config tab on your machine’s page. Click on the Components subtab and click the Create component button in the lower-left corner.
Select board as the type and pi as the model. Name the component pi, then click Create.

Configure your webcam
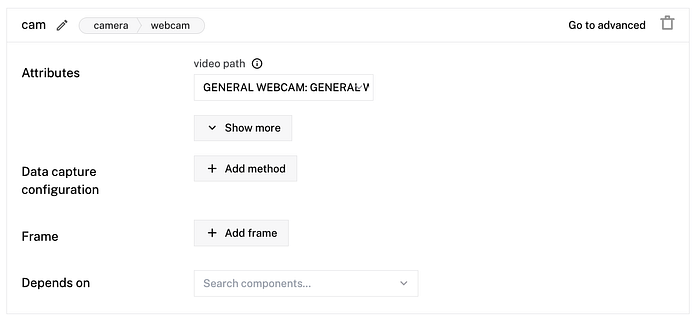
Click Create component and add your webcam with type camera and model webcam. Name the component petcam, then click Create.
Click on the video path. If the robot is connected, a dropdown menu with available cameras will appear. Select your camera.
TIP
If you are unsure which camera to select, select one, save the configuration and go to the Control tab to confirm you can see the expected video stream.
Configure your stepper motor
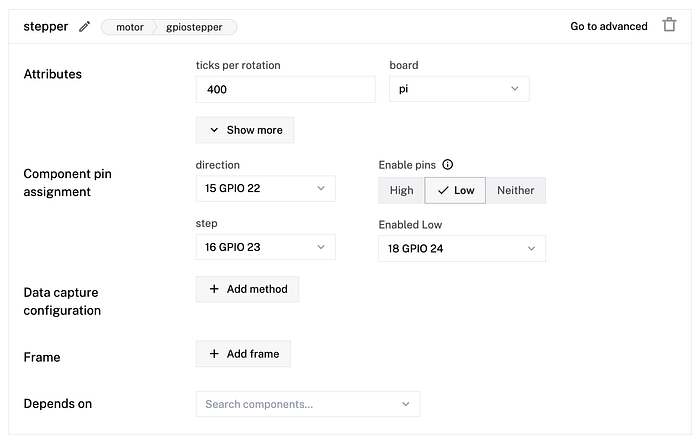
Finally, click Create component and add another component with type motor and model gpiostepper.
- If you used the same pins as in the wiring diagram, set the direction to pin
15 GPIO 22, and the step logic to pin16 GPIO 23. - Set the Enable pins toggle to
low, then set the resulting Enabled Low dropdown to pin18 GPIO 24. - Set the ticks per rotation to
400and select your board model,pi.
Click Save config in the bottom left corner of the screen.
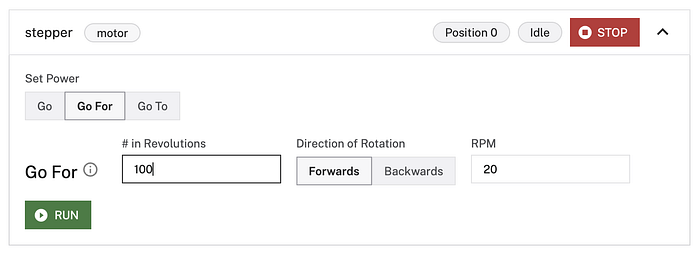
To test everything is wired and configured correctly, head to the Control tab. Start by testing the motor. Click on the motor panel and set the RPM to 20 and # of Revolutions to 100 to see your treat dispensing mechanism in action. Feel free to tweak these values to achieve the desired speed of your dispenser.
Next, test your camera. Click on the camera panel and toggle the camera on. Now check if you can see your pet! Your pet may be a little skeptical of your robot at first, but once you get some treats in there, your furry friend will love it in no time!

Use machine learning to recognize your pet
Let’s make our pet feeder smart with some data capture and machine learning models! To do that, you’ll first have to configure Data Management to capture images. Then you can use these images to train a machine learning model on your pet.
Configure data management
To enable the data capture on your robot, do the following:
- Under the Config tab, select Services, and navigate to Create service. Here, you will add a service so your robot can sync data to the Viam app in the cloud.
- For type, select Data Management from the dropdown, and give your service a name. We used
pet-datafor this tutorial. - Ensure that Data Capture is enabled and Cloud Sync is enabled. Enabling data capture here will allow you to view the saved images in the Viam app and allow you to easily tag them and train your own machine learning model. You can leave the default directory as is. This is where your captured data is stored on-robot. By default, it saves it to the~/.viam/capture directory on your machine.

Next, enable the Data Management service on the camera component on your robot:
- Go to the Components tab and scroll down to the camera component you previously configured.
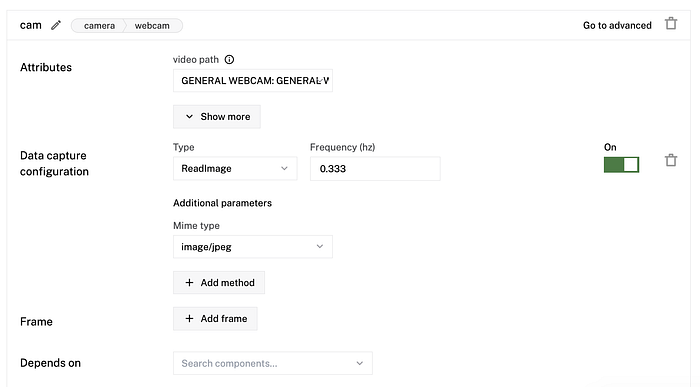
- Click + Add method in the Data Capture Configuration section.
- Set the Type to
ReadImageand the Frequency to0.333. This will capture an image from the camera roughly once every 3 seconds. Feel free to adjust the frequency if you want the camera to capture more or less image data. You want to capture data quickly so that you have as many pictures of your pet as possible so your classifier model can be very accurate. You should also select the Mime Type that you want to capture. For this tutorial, we are capturingimage/jpegdata.
Capture images of your pet
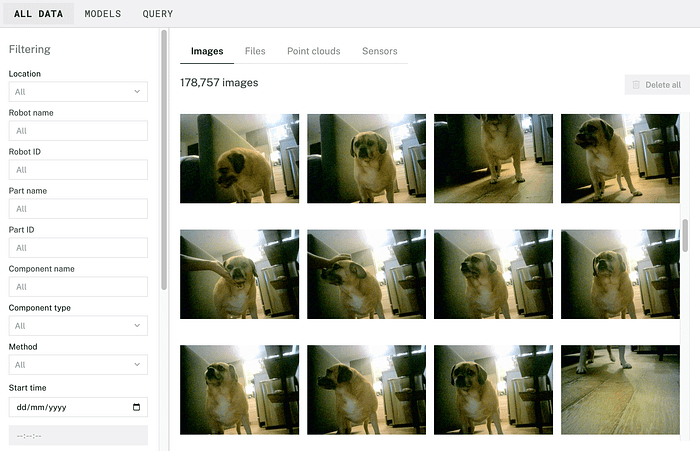
Now it’s time to start collecting images of your beloved pet. Set your feeder up near an area your pet likes to hang out like your couch or their bed or mount it temporarily over their food bowl, or even just hold it in front of them for a couple of minutes. You can check that data is being captured by heading over to the DATA page and filtering your image data to show just images from the location your pet feeder is in. Capture as many images as you want. If possible, capture your pet from different angles and with different backgrounds. Disable Data Capture after you’re done capturing images of your pet.
Create a dataset and tag images
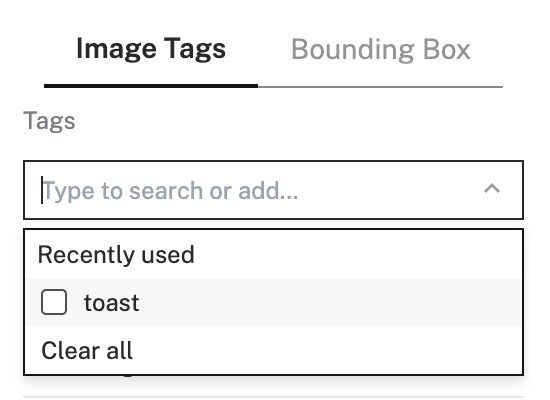
Head over to the DATA page and select an image captured from your machine. After selecting the image, you can type a custom tag for some of the objects you see in the image and you add it to a dataset. The first thing you want to consider is what tags you are trying to create and how you want your custom model to function.
For the treat dispenser, you can tag images with the name of the pet, in our case toast. Notice that in our image collection, we captured images at different angles and with different background compositions. This is to ensure that our model can continue to recognize the object no matter how your robot is viewing it through its camera. To be able to train on the data you are tagging you also need to add each image to a dataset.
Begin by selecting the image you would like to tag, and you will see all of the data that is associated with that image. Type in your desired tag in the Tags section.
Be mindful of your naming as you can only use alphanumeric characters and underscores: this is because the model will be exported as a .tflite file with a corresponding .txt file for labeling.
There should have been a video here but your browser does not seem to support it. There should have been a video here but your browser does not seem to support it.
Then use the Datasets dropdown to create a new dataset and assign the image to it. We called our dataset petfeeder.
For each image, add tags to indicate whether it contains your pet and add the image to your dataset.
Note we are just tagging the whole image as we are training an image classification model.
Continue parsing through your collected data (in this case images) and tag away and assign to your dataset to your heart’s desire. Tag as many images with as many tags until you are happy with your dataset. This is important for the next step.
View your dataset
Upon completion of tagging your data set, you can view the data in your dataset by clicking on your dataset’s name on the image sidebar or on the DATASETS subtab.
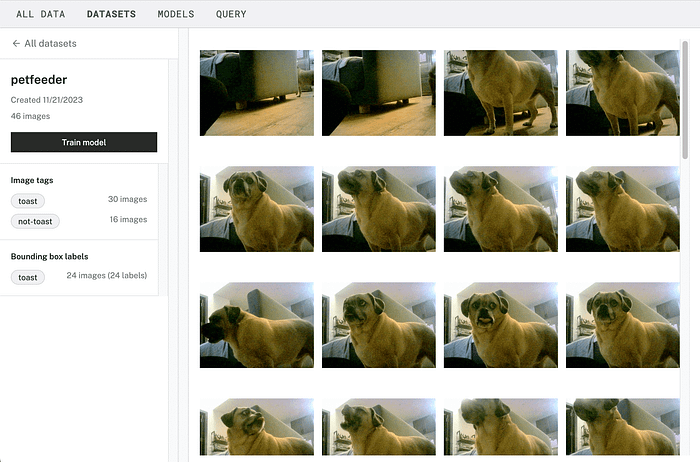
Train a model
From the dataset view, click on Train model, name your model and select Single label as the model type. Then select the label or labels that you used to label your pet images. We called it petfeeder and selected the tag toast and no-toast to train on images of the pup and images that do not contain the pup.
If you want your model to be able to recognize multiple pets you can instead create a Multi Label model based on multiple tags. Go ahead and select all the tags you would like to include in your model and click Train Model.
Deploy your model to your robot
Once the model has finished training, deploy it by adding an ML model service to your robot:
- Navigate to the machine page on the Viam app. Click to the Config tab, then select the Services subtab.
- Click Create service in the lower-left corner.
- Select
ML Modelas the type, and selectTFLite CPUas the model. - Enter
puppyclassifieras the name, then click Create. - To configure your service and deploy a model onto your robot, select Deploy Model On Robot for the Deployment field.
- Select your trained model (
petfeeder) as your desired Model.
Use the vision service to detect your pet
To detect your pet with your machine learning model, you need to add a vision service that uses the model and a transform camera that applies the vision service to an existing camera stream and specifies a confidence threshold:
- From the Services subtab, click Create service in the lower-left corner.
- Select
Visionas the type andML Modelas the model. - Enter a name for your ML model service and click Create.
- Select the model you previously created in the dropdown menu.
- Navigate to the Components subtab and click Create component in the lower-left corner.
- Create a transform camera by selecting type
cameraand modeltransform. - Enter
classifier_camas the name for your camera, then click Create. - Replace the JSON attributes with the following object which specifies the camera source for the transform cam and also defines a pipeline that adds the
classifieryou created.
{
"source": "petcam",
"pipeline": [
  {
      "attributes": {
          "classifier_name": "puppyclassifier",
          "confidence_threshold": 0.9
      },
      "type": "classifications"
  }
]
}
9. Head to your robots Control tab, click on your transform cam, toggle it on and you should be able to view your transform cam and if pointed at your pet, it should show it detecting your pet!
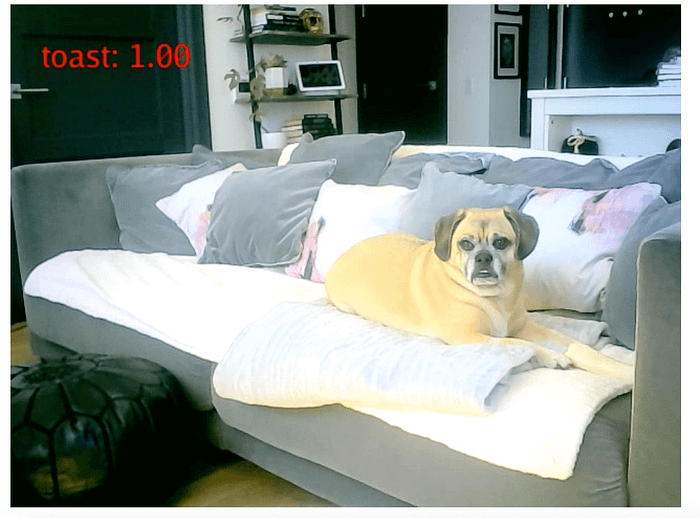
Control your robot programmatically
With your robot configured, you can now add a program to your robot that controls the pet feeder when executed, using the Viam SDK in the language of your choice. This tutorial uses Python.
Set up your Python environment
Open your terminal and ssh into your Pi. Run the following command to install the Python package manager onto your Pi:
sudo apt install python3-pipCreate a folder named petfeeder for your code and create a file called main.py inside.
The Viam Python SDK allows you to write programs in the Python programming language to operate robots using Viam. To install the Python SDK on your Raspberry Pi, run the following command in your existing ssh session to your Pi:
pip3 install --target=petfeeder viam-sdk python-vlcImportant
If you want your robot to automatically run your code upon startup, it is important to install the package into the petfeeder folder because of how the Viam platform runs the process.
Add the connection code
Go to your robot’s page on the Viam app and navigate to the Code sample tab. Select Python, then copy the generated sample code and paste it into the main.py file.
API key and API key ID
By default, the sample code does not include your machine API key and API key ID. We strongly recommend that you add your API key and API key ID as an environment variable and import this variable into your development environment as needed.
To show your machine’s API key and API key ID in the sample code, toggle Include secret on the Code sample tab. You can also see your API key and API key ID on your machine’s Security tab.
Caution
Do not share your API key or machine address publicly. Sharing this information could compromise your system security by allowing unauthorized access to your machine, or to the computer running your machine.
Save the file and run this command to execute the code:
python3 main.pyWhen executed, this sample code connects to your robot as a client and prints the available resources.
Add the logic
If your program ran successfully and you saw a list of resources printed from the program, you can continue to add the robot logic.
You’ll be using the puppyclassifier. The following code initializes a camera and the puppyclassifier and shows you how to get the classifications from the classifier when passing in the camera stream as an argument:
petcam = Camera.from_robot(robot, "petcam")
puppyclassifier = VisionClient.from_robot(robot, "puppyclassifier")
classifications = await puppyclassifier.get_classifications_from_camera(
    camera_name)
Remove the existing code in the main function and replace it with the following logic where the the code gets classifications from the puppyclassifier based on the camera stream, and if a pet is found, activates the stepper motor using the go_for() method to move a certain amount to dispense a treat.
async def main():
    robot = await connect()
    # robot components + services below, update these based on how you named
    # them in configuration
    pi = Board.from_robot(robot, "pi")
    petcam = Camera.from_robot(robot, "petcam")
    stepper = Motor.from_robot(robot, "stepper")
    puppyclassifier = VisionClient.from_robot(robot, "puppyclassifier")
    while True:
        # look if the camera is seeing the dog
        found = False
        classifications = await \
            puppyclassifier.get_classifications_from_camera(camera_name)
        for d in classifications:
            # check if the model is confident in the classification
            if d.confidence > 0.7:
                print(d)
                if d.class_name.lower() == "toastml":
                    print("This is Toast")
                    found = True
        if (found):
            # turn on the stepper motor
            print("giving snack")
            state = "on"
            await stepper.go_for(rpm=80, revolutions=2)
            # stops the treat from constantly being dispensed
            time.sleep(300)
        else:
            # turn off the stepper motor
            print("it's not the dog, no snacks")
            state = "off"
            await stepper.stop()
        await asyncio.sleep(5)
        # don't forget to close the robot when you're done!
        await robot.close()

if __name__ == '__main__':
    asyncio.run(main())
Save your file and run the code, put your pet in front of the robot to check it works:
python3 main.pyRun the program automatically
One more thing. Right now, you need to run the code manually every time you want your robot to work. However, you can configure Viam to automatically run your code as a process.
Navigate to the Config tab of your machine’s page in the Viam app. Click on the Processes subtab and navigate to the Create process menu.
Enter main as the process name and click Create process.
In the new process panel, enter python3 as the executable, main.py as the argument, and the working directory of your Raspberry Pi as /home/pi/petfeeder. Click on Add argument.
Click Save config in the bottom left corner of the screen.
Now your robot starts looking for your pet automatically once booted!
- Add speakers and record your voice so that the pet feeder can play a message to your pet each time it dispenses a treat.
- Train an ML model to recognize when your pet performs a trick, and withhold the treat until a specific trick is detected.
- Add a button that your pet must press to access the treat. If you add several treat types, you might include a different color button for each treat type, allowing your pet to choose.
- If you have multiple pets, you could configure different treats for each pet by training the ML model on each pet, and dispensing different treats depending on the pet recognized.
Full code
import asyncio
import os
import time
from viam.robot.client import RobotClient
from viam.rpc.dial import Credentials, DialOptions
from viam.components.board import Board
from viam.components.camera import Camera
from viam.components.motor import Motor
from viam.services.vision import VisionClient
# these must be set, you can get them from your machine's 'Code sample' tab
robot_api_key = os.getenv('ROBOT_API_KEY') or ''
robot_api_key_id = os.getenv('ROBOT_API_KEY_ID') or ''
robot_address = os.getenv('ROBOT_ADDRESS') or ''
# change this if you named your camera differently in your robot configuration
camera_name = os.getenv('ROBOT_CAMERA') or 'petcam'

async def connect():
    opts = RobotClient.Options.with_api_key(
      api_key=robot_api_key,
      api_key_id=robot_api_key_id
    )
    return await RobotClient.at_address(robot_address, opts)

async def main():
    robot = await connect()
    # robot components + services below, update these based on how you named
    # them in configuration
    pi = Board.from_robot(robot, "pi")
    petcam = Camera.from_robot(robot, "petcam")
    stepper = Motor.from_robot(robot, "stepper")
    puppyclassifier = VisionClient.from_robot(robot, "puppyclassifier")
    while True:
        # look if the camera is seeing the dog
        found = False
        classifications = await \
            puppyclassifier.get_classifications_from_camera(camera_name)
        for d in classifications:
            # check if the model is confident in the classification
            if d.confidence > 0.7:
                print(d)
                if d.class_name.lower() == "toastml":
                    print("This is Toast")
                    found = True
        if (found):
            # turn on the stepper motor
            print("giving snack")
            state = "on"
            await stepper.go_for(rpm=80, revolutions=2)
            # stops the treat from constantly being dispensed
            time.sleep(300)
        else:
            # turn off the stepper motor
            print("it's not the dog, no snacks")
            state = "off"
            await stepper.stop()
        await asyncio.sleep(5)
        # don't forget to close the robot when you're done!
        await robot.close()

if __name__ == '__main__':
    asyncio.run(main())
Next steps
Take your smart pet feeder to the next level! You could try one of the following:
- Add speakers and record your voice so that the pet feeder can play a message to your pet each time it dispenses a treat.
- Train an ML model to recognize when your pet performs a trick, and withhold the treat until a specific trick is detected.
- Add a button that your pet must press to access the treat. If you add several treat types, you might include a different color button for each treat type, allowing your pet to choose.
- If you have multiple pets, you could configure different treats for each pet by training the ML model on each pet, and dispensing different treats depending on the pet recognized.